Machine Learning for Hummingbird Detection Camera 📷
This project uses image recognition software to capture hummingbirds. Artificial neural networks plus Python code are applied to hours of video footage to extract and concatenate clips containing hummingbirds coming to a sugar-water feeder.
| Engineer | School | Area of Interest | Grade |
|---|---|---|---|
| Sindu | Evergreen Valley High School | Environmental/Software Engineering | Incoming Junior |
3️⃣ Final Milestone
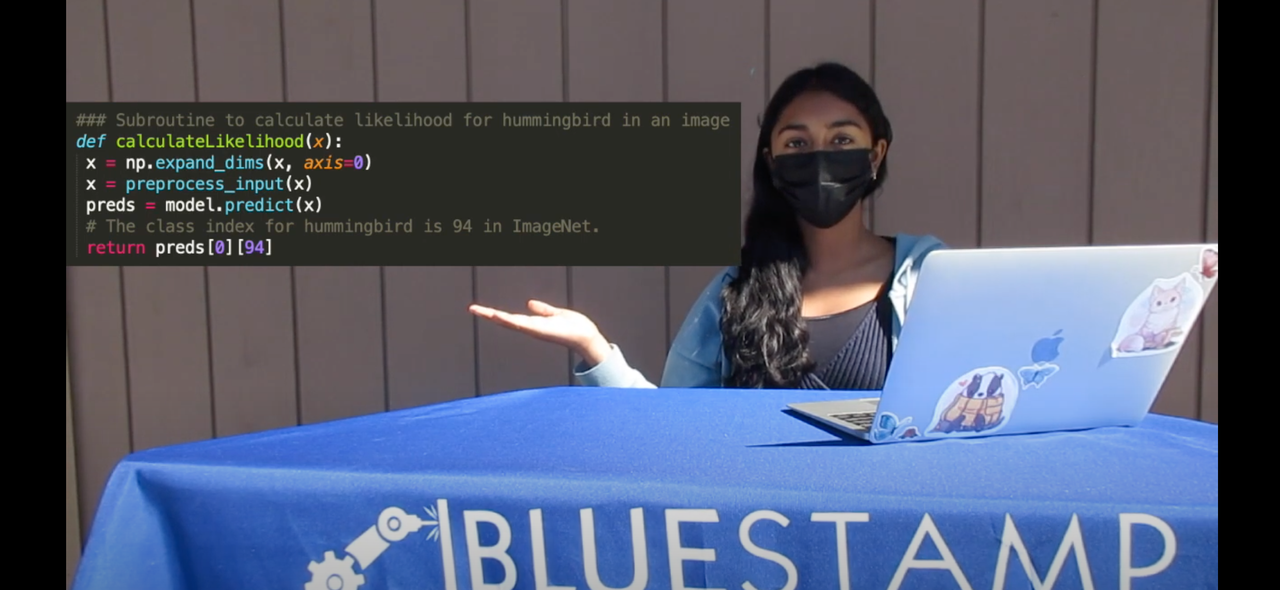
My final milestone was taking the footage I captured in my backyard and running the code and ResNet on the footage. We had some issues with the ground truth labeling, running the ResNet on long videos, saving frames without draining storage, and some others. We changed a lot of aspects of the code, removed sections, and added new code. Eventually, we were able to run the ResNet and code on several videos and get results. Since the videos were very long, we changed the code to save only two frames per second instead of 120, like the standard setting, which would have completely drained my computer’s storage. Each image was given a likelihood percentage that it contained a hummingbird, as predicted by the ResNet. (However, the ResNet did end up not being completely accurate, giving several inaccurate predictions for the hummingbirds.) We then worked on concatenating the clips that did contain hummingbirds, and gave requirements to end a clip when the probability became too low, meaning there was no longer a hummingbird. We ended up cutting out the ground truth labeling and plotting code, as we ran into some problems and couldn’t change it to work with my project.
hummingbird.py (updated)
### Code to detect whether an image contains any hummingbirds.
import ssl
import os
import cv2

ssl._create_default_https_context = ssl._create_unverified_context
from tensorflow.keras.applications.resnet50 import ResNet50
from tensorflow.keras.preprocessing import image
from tensorflow.keras.applications.resnet50 import preprocess_input, decode_predictions
from moviepy.editor import *
from moviepy.video.io.ffmpeg_tools import ffmpeg_extract_subclip
import numpy as np
import matplotlib.pyplot as plt
from PIL import Image

### Subroutine to calculate likelihood for hummingbird in an image
def calculateLikelihood(x):
	x = np.expand_dims(x, axis=0)
	x = preprocess_input(x)
	preds = model.predict(x)
	# The class index for hummingbird is 94 in ImageNet.
	return preds[0][94]

def extract(t1, t2, i):
	os.environ["FFMPEG_BINARY"] = "/usr/local/bin/ffmpeg"
	# looping through the cropped videos
	ffmpeg_extract_subclip("crop1.mov", t1, t2, targetname="hum_clip{}.mp4".format(i))
	print("subclip made!!")

def concatter(i):
	# creating an array with each hum_clip
	for x in range (1, i):
		sub_clips.append("hum_clip{}.mp4".format(x))
	for name in sub_clips:
		clips.append(VideoFileClip(name))
	video = concatenate_videoclips(clips, method='compose')
	video.write_videofile('compilation.mp4')
	print("All files successfully combined. Consider your intensive project complete!")

### Load model and define parameters
model = ResNet50(weights='imagenet')
dim = 300
height = 720
width = 1280
expecteddim = 224
i = 1
t1 = 0
t2 = 0
concat = False
clips = []
sub_clips = []
# change based on number of frames
num_of_frames = 72
### Loop through the images
for n in range(1, num_of_frames+1):
	# Read the image
	name = 'frame{}.jpg'.format(n)
	img_path = name
	img = image.load_img(img_path)
	# Crop the image, resize it and make prediction
	startx = 300
	starty = 125
	endx = startx + dim
	endy = starty + dim
	cropped_img = img.crop((startx, starty, endx, endy))
	resize_img = cropped_img.resize((expecteddim, expecteddim), Image.ANTIALIAS)
	x = image.img_to_array(resize_img)
	p1 = calculateLikelihood(x)
	# Repeat above but close to another flower
	startx = 925
	starty = 25
	endx = startx + dim
	endy = starty + dim
	cropped_img = img.crop((startx, starty, endx, endy))
	resize_img = cropped_img.resize((expecteddim, expecteddim), Image.ANTIALIAS)
	x = image.img_to_array(resize_img)
	p2 = calculateLikelihood(x)
	# Take the maximum likelihood as the return likelihood
	print(name, max(p1, p2))
	#data.append(max(p1, p2))
	time_stamp = n*.5 #one frame/two seconds
	data.append([name, time_stamp, max(p1,p2)])
	if (max(p1,p2) >= .5 and concat == False):
		t1 = n-1
		concat = True
		#print(t1)
	if (max(p1, p2) <= .1 and concat == True):
		t2 = n-1
		extract(t1, t2, i)
		i+=1
		#print(t2)
		concat = False

concatter(i)
Final Hummingbird Footage

2️⃣ Second Milestone
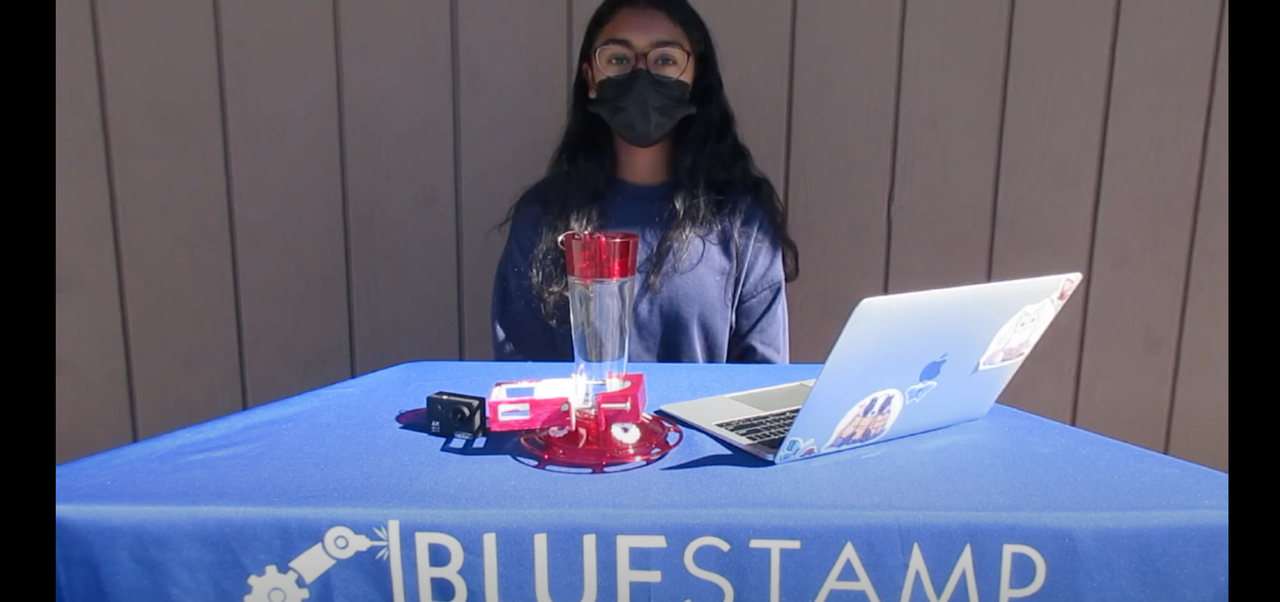
My second milestone was the hardware portion of the project. This aspect was relatively simple, and surprisingly, the most difficult part of this portion was to get hummingbirds to come to my feeder. The materials I used were:
- a hummingbird feeder
- a small, high-quality camera (the REMALI 4K Ultra HD Sports Action Camera)
- a 3D-printed camera mount
- thick string
- nuts & bolts (2)
Here is a picture of the contraption:

Putting together the feeder-camera-mount contraption was very straightforward: I inserted long nuts & bolts to connect both parts of the 3D-printed camera mount, and this proved to be better, as I was able to adjust how high up the feeder I wanted to hang the camera. The camera mount had a slot where I was just able to slide in the camera. Despite this part being relatively simple, I did run into several problems:
- The camera had several issues, such as running out of battery quickly, limited storage, and cutting up video clips. We eventually figured it out and the camera functioned fine.
- My feeder became overrun by ants, so I had to take it down and thoroughly clean it. I considered sticking it in the middle of our bird bath, so it would act as a moat, but I eventually figured out that I could fill the red lid at the top with water, which was very effective to keep the ants out.
- Lastly, the most serious but most unexpected problem: hummingbirds wouldn’t come to my feeder! This I didn’t expect, as hummingbirds are regulars to the many hollyhocks (one of their favorite flowers) in our backyard, but they somehow wouldn’t come near the feeder, despite it being bright red (a color that attracts them easily). I experimented with various locations around my backyard, and eventually several hummingbirds arrived.
1️⃣ First Milestone
My first milestone was to complete the software portion of the project. I imported code from the original project and configured it for my project. The troubleshooting process took most of the second week and continued into the third. I imported a variety of tools to run my code, such as Tensorflow(an ML/AI library), ResNet(a residual learning network), the Matlab environment(to use a ground truth labeler), and Matplotlib(a Python plotting library), among other applications. I debugged the code and made sure it was free of errors, customized some code for ground truth labeling the images and generating plots, and also imported and debugged a separate code to split video footage into separate frames and save the frames as images. Overall, this is the purpose of the code:
- pics.py file:
- Splits the video up into separate frames.
- Creates a folder, saves the images and puts them all in the folder.
- hummingbird.py file:
- Creates a subroutine to make a prediction of the likelihood that there is a hummingbird.
- Crops and resizes the images so that ResNet can be ran on them.
- The code constrains the program to run on specific areas of the image to make it more accurate.
- The ResNet network is applied to the frames to calculate the likelihood of a hummingbird being in the image.
- Ground truth labels created to compare the results to ground truths and thus improve the accuracy of the predictions.
- Finally, plots the predictions that the images contained hummingbirds in a scatter plot.
pics.py
### Code to split video footage into frames and save the separate frames as images.
import cv2
import os

# Opens up a video file from the computer.
cam = cv2.VideoCapture("VID_20220401_114955_LS.mp4")

try:

    # creating a folder named data
    if not os.path.exists('data'):
        os.makedirs('data')

# if not created then raise error
except OSError:
    print ('Error: Creating directory of data')

# frame
currentframe = 0

while(True):

    # reading from frame
    ret,frame = cam.read()

    if ret:
        # if video is still left continue creating images
        name = './data/frame' + str(currentframe) + '.jpg'
        print ('Creating...' + name)

        # writing the extracted images
        cv2.imwrite(name, frame)

        # increasing counter so that it will
        # show how many frames are created
        currentframe += 1
    else:
        break

cam.release()
#cv2.destroyAllWindows()
hummingbird.py
### Code to detect whether an image contains any hummingbirds. It also includes an evaluation snippet.
import ssl

ssl._create_default_https_context = ssl._create_unverified_context
from tensorflow.keras.applications.resnet50 import ResNet50
from tensorflow.keras.preprocessing import image
from tensorflow.keras.applications.resnet50 import preprocess_input, decode_predictions
import numpy as np
import matplotlib.pyplot as plt
from PIL import Image

### Subroutine to calculate likelihood for hummingbird in an image
def calculateLikelihood(x):
 x = np.expand_dims(x, axis=0)
 x = preprocess_input(x)
 preds = model.predict(x)
 # The class index for hummingbird is 94 in ImageNet.
 return preds[0][94]

### Load model and define parameters
model = ResNet50(weights='imagenet')
dim = 861
height = 1098
width = 2234
expecteddim = 224
data = []
N = 12
### Loop through the images
for n in range(1, N):
  # Read the image
  name = 'thumb' + '{0:04d}'.format(n) + '.jpeg'
  img_path = name
  img = image.load_img(img_path)
  # Crop the image, resize it and make prediction
  startx = 0
  starty = 0
  endx = startx + dim
  endy = starty + dim
  cropped_img = img.crop((startx, starty, endx, endy))
  resize_img = cropped_img.resize((expecteddim, expecteddim), Image.ANTIALIAS)
  x = image.img_to_array(resize_img)
  p1 = calculateLikelihood(x)
  # Repeat above but close to another flower
  startx = width - dim
  starty = 0
  endx = startx + dim
  endy = starty + dim
  cropped_img = img.crop((startx, starty, endx, endy))
  resize_img = cropped_img.resize((expecteddim, expecteddim), Image.ANTIALIAS)
  x = image.img_to_array(resize_img)
  p2 = calculateLikelihood(x)
  # Take the maximum likelihood as the return likelihood
  print(n, max(p1, p2))
  data.append(max(p1, p2))

### Compare with ground truth labels
trueXList = []
trueYList = []
falseXList = []
falseYList = []
ground_truth = {"thumb0001.jpeg": ["t", 0] , "thumb_0002.jpeg": ["f", 1], "thumb0003.jpeg": ["t",2], "thumb0004.jpeg": ["t", 3], "thumb0005.jpeg": ["t", 4], "thumb0006.jpeg": ["t",5], "thumb0007.jpeg": ["t",6] , "thumb0008.jpeg": ["t", 7], "thumb0009.jpeg": ["t", 8], "thumb0010.jpeg": ["t", 9], "thumb0011.jpeg": ["t",10]}
for img in ground_truth:
	img_info = (ground_truth[img])
	index = img_info[1]
	print(img_info[0])
	if img_info[0] == "t":
		trueXList.append(img_info[1])
		trueYList.append(data[index - 1])
	else:
		falseXList.append(img_info[1])
		falseYList.append(data[index - 1])

### Generate plots
plt.scatter(falseXList, falseYList, color='red')
plt.scatter(trueXList, trueYList, color='green')
plt.show()
Starter Project
My starter project is the customizable Arduino project, in which I used the Piezo buzzer as my output. The Piezo buzzer plays various tones at different frequencies to create a song. The materials I used are:
- an Arduino Uno microboard
- an Arduino Proto Shield
- two jumper wires
- a Piezo buzzer
- solder & a soldering iron
This is my procedure:
- First, I soldered on three headers to the Arduino Proto Shield.
- Using these headers, I was able to connect the Proto Shield and the Uno by sliding the headers together.
- Now that the two components were connected, I built my circuit: I connected one jumper wire from the positive side of the Piezo buzzer to pin 9 on the Proto Shield, and another wire from the negative side to the ground pin(GND).
- I then connected the Arduino Uno to my laptop using a USB cable.
- The project came with Arduino code, which: corresponded frequencies to note characters, defined the song length, defined the note sequence and their corresponding beats, the tempo, and included other loops and functions to play the song.
- I imported it and ran the code, and the buzzer played a simple melody.
- Afterwards, I experimented with changing the code to play different songs by tweaking the note sequence, song length, and beats.