Yurika_BSE_Project
View the Project on GitHub BlueStamp-Engineering-2022/Yurika_BSE_Project
Music Synthesizer (MIDI)
Make a Magical Music Machine by building your own MIDI controller!
My audio synthesizer is a physical interface that uses MIDI (Musical Interface Digital Interface) to play sounds & ultimately make music.
| Engineer | High School | Area of Interest | Grade |
|---|---|---|---|
| Yurika | St. Francis | Software Engineering, Design, Firmware | Incoming Senior |
Making my Magical Music Machine:
Final Milestone
Milestone three was polishing up to ensure that my device had no other errors. Once the hardware issue was resolved, I connected my MIDI controller to the computer, opened Garageband, and played around with different sound sets, such as the drums, piano, and violin. I learned to play some of my favorite songs on the MIDI controller with the piano sounds. I labeled each button according to their note on the piano to make it easier for me to play songs. You can see in my demo video when I played a short bit of a song on piano and a bit on the drum set. While I was initially hoping to make my own modifications such as slider potentiometers to control note range and pitch, the hardware error took longer to resolve and I was not ablwe to get to my modifications. However, I’ve worked on them after the program and I am very happy with the result of my device. I play with it almost everyday, whether it’s to experiment with new sounds or to relieve some stress. During this project, I switched my Arduino Uno to an Arduino mini, experimented with various music software, implemented different code programs, and adapted to the challenges I faced. I am forever grateful for my experience here, where I learned that no matter the challenges put against me, I will always overcome as long as I continue to try. Thanks for checking my project out!
Demonstration:
Second Milestone
Milestone two is the hardware. To assemble the box together, I first produced a detailed and accurate mechanical drawing with dimensions. I then drilled into my enclosure using 1 inch drill bits. I filed down the sides of the holes and popped the buttons & potentiometers in. After securing the buttons and potentiometers to my enclosure, I began on wiring and soldering my circuit. I soldered wires to my buttons & potentiometers, then An Arduino Micro on a breadboard is connected to my computer with Garageband open. I really enjoyed learning how to drill, saw, solder, & gained very useful hardware skills. When I tested my assembled device, I ran into a problem: the buttons would not play sounds invidually, they would only play a sound when all of them were pressed. The potentiometers also were very inconsistent & one would only work to control the volume. I triple checked my wiring, soldering, assembly, code, and everything I’ve done to that point. I asked every instructor to help find the error and they helped with conducting tests to troubleshoot. I walked into every classroom, asking other students with similar projects on what they did. I spent most of my days frustratingly retracing my steps & troubleshooting & asking for another set of eyes. After weeks, an instructor found that it was the breadboard that had disconnected parts, making my project faulty. I’ve never felt so happy in my life! After wiring the breadboard together so that it was all connected, my MIDI controller worked perfectly.
My Mechanical Drawing:

Wiring:

First Milestone
Milestone one is to test the functionality of one button through wiring it to an arduino, in order to familiarize with the wiring process of the controller. I connected a wire from ground to the negative side of the breadboard, then used alligator clips to securely connect the wires to the button. I uploaded a code that turns the LED light on when the button is pressed. Now that I know that the buttons work, the next step would be to test the button’s functionality in relation to MIDI, so that pressing the button would initate a sound to be played. After a lot of debugging & troubleshooting, I was able to play sounds from Garageband by pressing a button.
Wiring a Push Button to an Arduino Uno with Two Wires:

Digital Diagram:

Starter Project
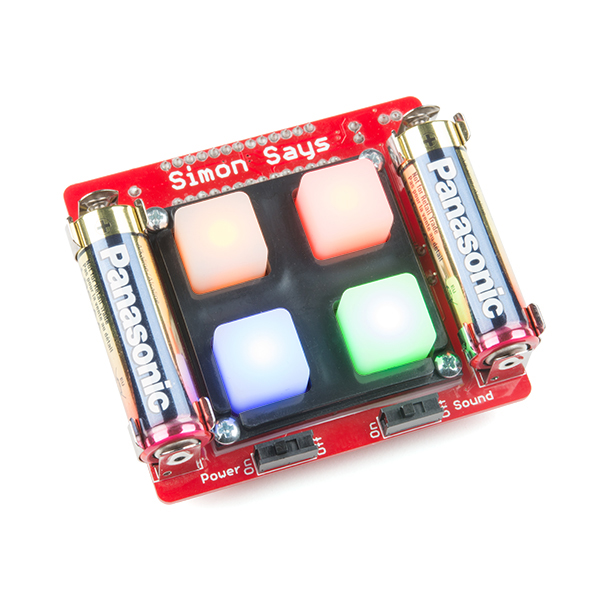
Simon Says Game is a fun game where the player attempts to replicate lighting patterns of the game. Through-hole components allowed me to easily solder on the resistor, microcontroller, capacitors, LEDs, buzzer, switches, and battery clips. I initially struggled to solder on components with accuracy, but with practice, I became very comfortable with soldering. Now, I love to solder whenever I get the chance to. When my game was not working due to unconnected components, I learned that it is very crucial to stay patient instead of messily rushing. After troubleshooting by double checking component by component, I found a disconnected portion on my circuit board. The game then worked! My starter project was greatly informing & exciting, and its button aspect would be a prominent aspect of my main project.
Simon Says Game:


